21 July 2023Jennifer Thatcher Technology Manager of Test Dept.
Last update by William Davis at 9 November 2026
Summary Learn how to record your iPhone screen effortlessly with our step-by-step guide. Capture game clips or record live videos with ease. Discover the perfect method now!
Record Your Phone's Screen Using the iPhone's Built-in Screen Recording Feature
①Make sure the screen recording button is in the iPhone’s Control Center
iPhones are equipped with a convenient, built-in screen recording feature which makes the installation of extra software unnecessary. To activate screen recording, first make sure that the screen recording icon—represented by a solid dot within a circle—is present in the Control Center. To open the Control Center on an iPhone X or later, swipe down from the upper right corner of the screen. For an iPhone 8 or earlier, swipe up from the bottom edge of the screen.
If it’s not in Control Center, you can add it to Control Center by following these steps:
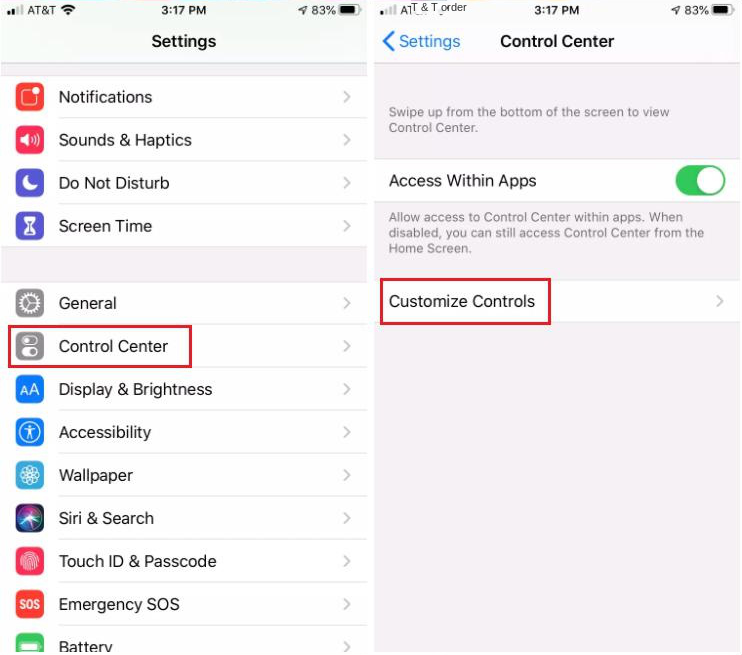
Step 1: Open (Settings), click (Control Center), and then click (Customize Controls).
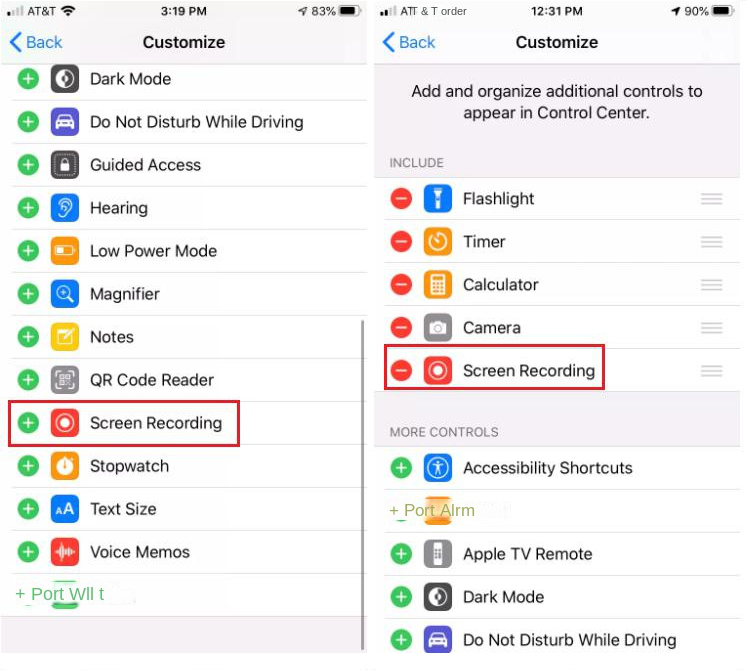
Step 2: Here you can add and delete items to the (Control Center) menu. Scroll down and tap the green button with a “+” next to (Screen Recording). This moves it from the (MORE CONTROLS) section at the bottom to the (INCLUDE) list at the top.
② Make screen recording
After adding the screen recording to the control center, you can start to record the iPhone screen. Specific steps are as follows:
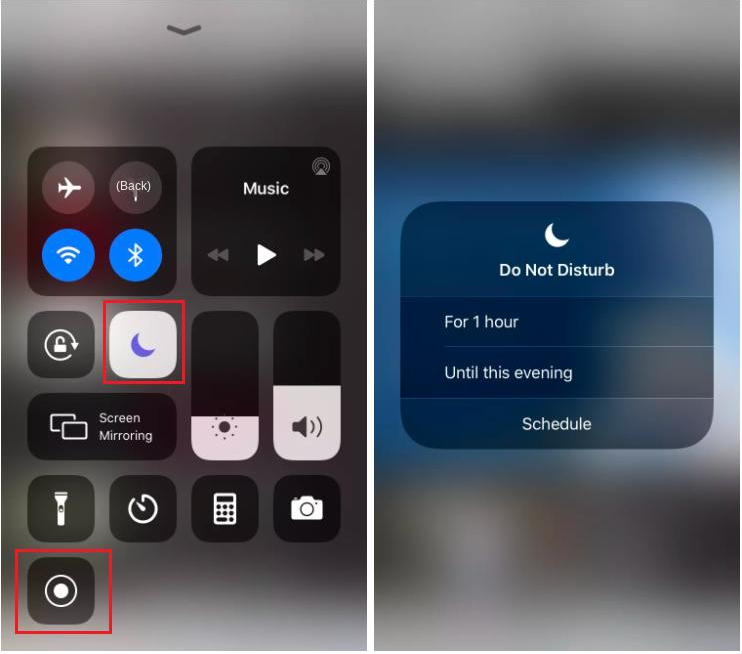
Step 1: To begin a screen recording on your device, first open the application or navigate to the website you wish to record. For iPhone 8 or earlier, swipe up from the bottom edge of the screen to access the Control Center. For iPhone X or later, swipe down from the top right corner of the screen.
Before you start recording, it’s recommended to enable Do Not Disturb to ensure an uninterrupted session. Do this by tapping the crescent moon icon.
Then, initiate the screen recording process by tapping the screen recording icon. There will be a three-second countdown before the recording begins. To hide the Control Center and capture your screen activity, simply tap the screen.
Step 2: After the recording is finished, please open (Control Center), click the record button again to stop the recording. The recorded screen video will be saved in the Photos app.
The above are all the steps for recording the screen of the iPhone. If you need to record the screen on other devices, you can check the content below.
II. Extended information: How to record screen on other system devices?
1. Use Renee Video Editor Pro to record computer screen in Windows system
Renee Video Editor Pro It is a video recording and editing tool that integrates computer screen recording, video post-production and format conversion functions. Among them, the computer screen recording function can set the recording area and screen size, and can also set the watermark, cursor style, sound source and saved format, automatic recording plan, etc., whether it is online movies, meeting video records, or game screens, software Operation steps, etc., it can help you record and save to the computer with one click.
In addition, the software can further improve and optimize the content of the video during video post-production, such as editing or merging video clips, Crop the video frame, rotate or flip the video, add various types of opening/ending animations, transition effects, switch between different filter styles at will, dub videos, add music or remove original sound effects, import or create exclusive subtitles, etc. After the video editing is completed, you can choose to convert the video to various formats you need. This software supports most video and audio formats, such as MXF, AVI, MKV , MP4, MOV, M2TS, M4V, AAC, AC3 and other formats, and supports free conversion between video and audio formats.
Renee Video Editor Pro – Multi-function Video Editing Software
Screen RecordingRecord screen and webcam in Windows computer.
Cut Videos & AudiosUsers are free to cut videos and audios clips with setting start and end time.
Multiple Edit ToolsMerge, crop, rotate, cut and transform video easily. Change and add background music, subtitles and remove watermark from video.
Format ConversionSupport to convert videos and audios into different formats.
Screen Recording Record screen and webcam in Windows computer.
Multiple Edit ToolsCut Videos & Audios Users are free to cut videos and audios clips with setting start and end time.
Multiple Edit ToolsMerge, crop, rotate, cut and transform video easily. Change and add background music, subtitles and remove watermark from video.
Format ConversionSupport to convert videos and audios into different formats.
32321 users have downloaded and edited videos with fun!
② How to record Windows device screen with Renee Video Editor Pro?
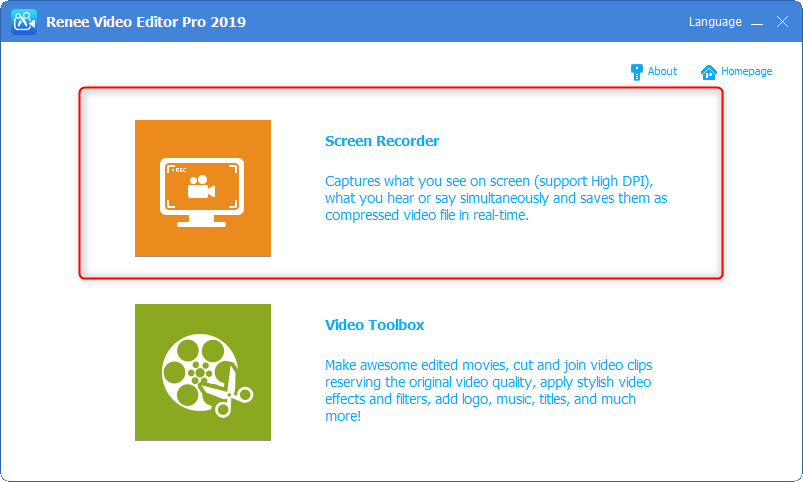
Step 1: After running the software, click the (Screen Recorder) option on the main page.
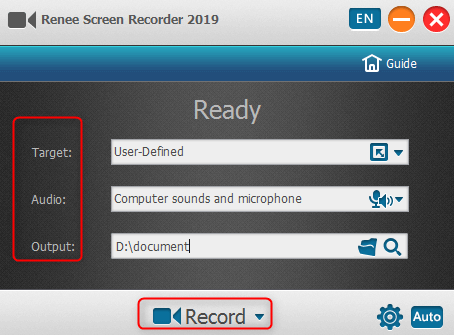
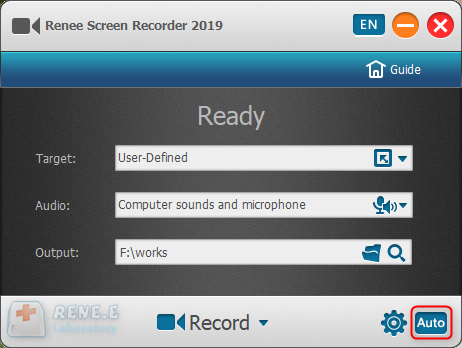
Step 2: Next, in the “Prepare to Record” interface, you can personalize the content to be recorded (Target), (Audio) and (Output). Here select the “Custom” recording area, and the option to record “Computer Sound and Microphone“.
Description of interface settings for preparing to record: Recording target: Supports recording full screen, custom area, and recording images captured by the camera. recording: It refers to the sound that needs to be included in the content recording process. It supports recording computer sound, microphone sound, and non-recording sound, etc. Output directory: Choose where to store recordings
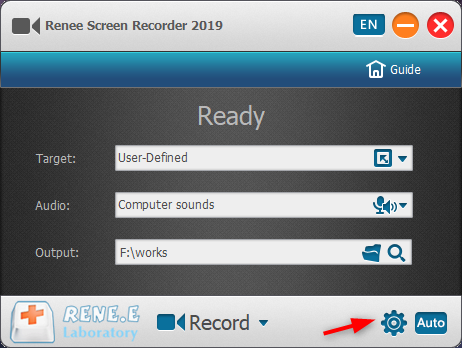
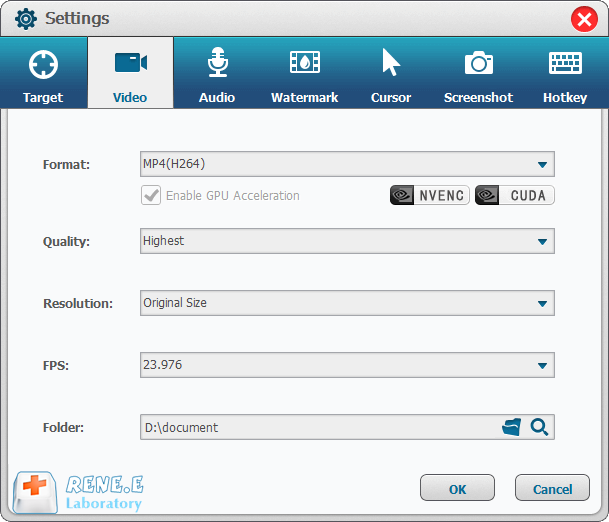
Step 3: In addition, click the (small gear) icon in the lower right corner, and you can also personalize parameters such as recording format, video quality, resolution, video frame rate, output directory, and watermark.
Step 4: After all the recording parameters are set, return to the “Ready to Record” interface, click the (Start ) button, you can select the recording area you want to record, and then click the (Recording) button in the lower right corner. Start recording your computer screen.
Step 5: You can pause or continue at any time during the recording process. After the recording is completed, click the small square button in the recording option box in the lower right corner, and the recorded video file will be saved to the preset path.
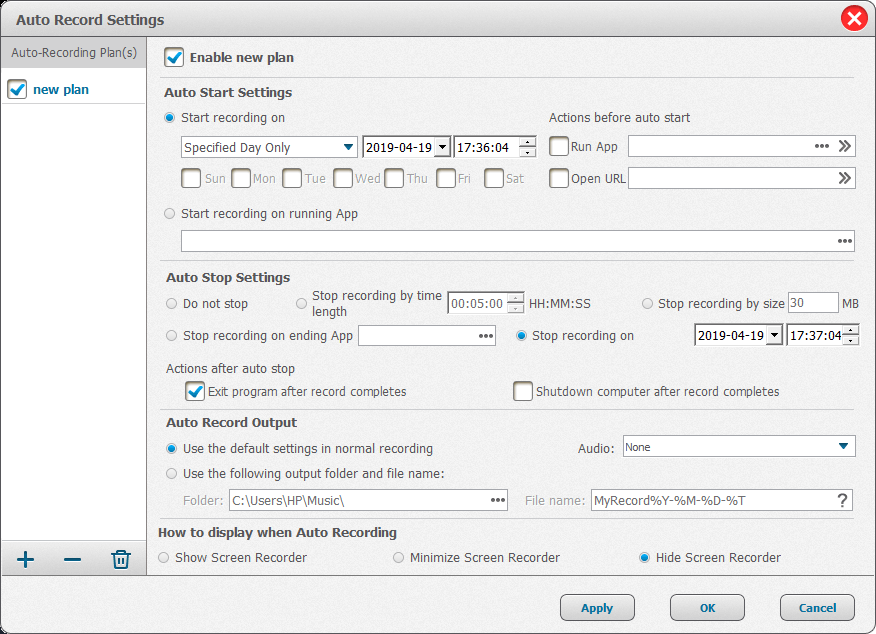
Renee Video Editor Pro offers an intuitive automatic recording feature. To utilize this function, simply click the ‘Auto’ button located at the bottom right of the “Ready to Record” screen. This enables you to set the precise start and end times for your recording session. The software will then automatically start recording at the planned start time, ensuring a seamless and effortless experience.
2. Use the ApowerREC app to record the phone screen on Android
ApowerREC is a versatile screen recording tool that supports running on Android. You can use it to record the contents of the Android phone screen, such as video chat, mobile games, etc. When recording the screen, it can also record the sound of the speaker/microphone.
It is also very simple to record the screen of an Android phone with the help of ApowerREC software. The specific operation steps are as follows:
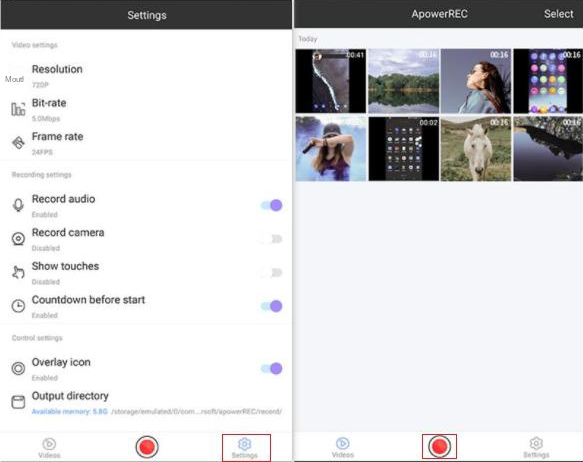
Download, install and run the ApowerREC software, click the (Settings) button on the bottom right to set the recording parameters, such as resolution, bit rate, frame rate, whether to record audio, whether to record camera, etc. After the setting is complete, click the red button in the middle of the bottom to record the screen of the Android phone. After you finish recording, you can return to the app to check the recorded file.
Note: If you want to record sound successfully, please do not plug in the power cord or wear any headphones, otherwise the sound will be lost.
Kind tipsIf you are a Mac computer user, you can also check how to record computer screen on Mac system.









User Comments
Leave a Comment